Raspberry Pi
We generally advise to use the latest version of the official
Raspberry Pi Os (formerly Raspbian) distribution. The Lite version is particularly indicated for use on robots and other embedded
systems, as it is a minimal installation without useless components inside. It comes by default without a graphical interface (which is the
advised configuration for embedded scenarios), however if a graphical interface is really needed, it is possible to install an X server with
apt install xinit and start it manually when needed (startx from the command line).
To deploy the image on a Micro-SD card, you can follow this guide on the Raspberry Pi web site. Once the image is written, immediately enable the SSH server (see section 3 of this guide) before booting it, so you can connect through the Ethernet port.
If using the provided HDMI to VGA converter, ensure that the following parameters are set in the config.txt file (it is on /boot from
the rPi filesystem, or on the first partition when accessing the SD card directly:
disable_overscan=0
hdmi_drive=2
config_hdmi_boost=4
On the other hand, if you use a HDMI to DVI cable or adapter, you will obtain a better image by commenting out these lines.
Network connection
There are two possibilities to connect the Raspberry Pi to the network and to Internet: the Ethernet port and the on-board Wi-Fi interface.
In ME B2 485 and in the test arena, you can connect the Raspberry to the secondary network card of one of the PCs, and start the computer under Linux.
The Raspberry will automatically get a private IP address and Internet access through the PC. To connect to the Raspberry from the PC, first
check its hostname (it should be raspberrypi) using the arp command, then ssh to that hostname.
If you want to work with Wi-Fi, please consider the following points:
- Creating personal hotspots with mobile phones is not allowed at EPFL to avoid interference (see here)
- Storing your GASPAR password in cleartext in the Raspberry Pi is not advised for obvious reasons.
- A special non-personal account is available to connect IoT devices of the robot competition to the EPFL wifi. The details are available on request.
Once you have the password to connect, create a file named /etc/NetworkManager/system-connections/EPFL.nmconnection file (you will need to use the
sudo command to run your editor, e.g. nano or vim) with the following contents:
[connection]
id=EPFL
uuid=73ec4a98-8c0e-4631-87d0-4f5f99bbb154
type=wifi
interface-name=wlan0

[wifi]
mode=infrastructure
ssid=epfl

[wifi-security]
key-mgmt=wpa-eap

[802-1x]
anonymous-identity=anonymous@epfl.ch
ca-cert=/etc/ssl/certs/DigiCert_Global_Root_G2.pem
eap=peap;
identity=dll-make-wifi@epfl.ch
password=▒▒▒▒▒▒▒▒▒▒▒▒▒▒▒▒▒▒▒▒▒
phase2-auth=mschapv2
phase2-subject-match=CN=radius.epfl.ch

[ipv4]
method=auto

[ipv6]
addr-gen-mode=default
method=auto
Once the file is created, set its permissions so only root can read it, otherwise it will be ignored. To do this, run the following command:
sudo chmod 600 /etc/NetworkManager/system-connections/EPFL.nmconnection
Finally, configure wpa_supplicant to use the wext driver, as the default one might have
issues with WPA2 Enterprise authentication. To do so, edit /etc/wpa_supplicant/wpa_supplicant.conf and add
a single line at the top of the file:
driver=wext
Once you have the password to connect, edit the /etc/wpa_supplicant/wpa_supplicant.conf file (you will need to use the
sudo command to run your editor, e.g. nano or vim) and replace the contents with:
ctrl_interface=/var/run/wpa_supplicant
  country=CH

  network={
    ssid="epfl"
    key_mgmt=WPA-EAP
    proto=WPA2
    eap=PEAP
    identity="dll-make-wifi@epfl.ch"
    password="▒▒▒▒▒▒▒▒▒▒▒▒▒▒▒▒▒▒▒▒▒"
    anonymous_identity="anonymous@epfl.ch"
    phase2="auth=MSCHAPV2"
    ca_cert="/etc/ssl/certs/DigiCert_Global_Root_G2.pem"
    subject_match="CN=radius.epfl.ch"
    priority=8
  }
You will also need to edit /etc/dhcpcd.conf to insert the following line:
env wpa_supplicant_driver=wext
After making these changes, simply reboot.
Dynamic DNS
When the Raspberry Pi (or any other device using the EPFL network) is online, you can find its IP address, provided you know the MAC address of its WiFi interface. To find it, use the following command:
ip link show wlan0
You will obtain an output similar to this:
3: wlan0: <BROADCAST,MULTICAST> mtu 1500 qdisc noop state DOWN mode DORMANT group default qlen 1000
    link/ether xx:xx:xx:xx:xx:xx brd ff:ff:ff:ff:ff:ff
The dynamic hostname of the device will be Mxxxxxxxxxxxx.dyn.epfl.ch, where the x sequence represents the MAC address
written without any semicolons or other separators. You can directly use this address to SSH; for example, assuming that the MAC address is
dc:a6:32:45:98:af, the command to use would be:
ssh pi@Mdca6324598af.dyn.epfl.ch
Automatically starting programs at boot
To automatically run one or more programs at boot, please do not put them in /etc/rc.local.
It is a very old technique, and has several drawbacks: among other things, you can't control when programs are started during the boot phase
(programs requiring network support might be started before the network is up, for example), and everything runs as root (unless you manually
use tools to switch to another user), which is a potential security hole and is very bad practice.
Systemd, which comes with Raspbian, is a much more modern way of dealing with automatically started software. It can automatically restart
software if it stops and can handle dependencies during boot. Creating a systemd service (named a unit file) is very easy. If you
want for example to have the script /home/pi/autostart.sh automatically running on each boot, as
user pi after the network is up, you can place the following file in /etc/systemd/system/autostart.service
(you can change the service name as you wish, of course):
[Unit]
Description=Automatic startup
After=network-online.target
Wants=network-online.target

[Service]
Type=simple
Restart=always
RestartSec=60
ExecStart=/home/pi/autostart.sh
User=pi

[Install]
WantedBy=multi-user.target
Once the file is created, you can enable it by running:
sudo systemctl enable autostart
(change the command according to how you named the unit file). After reboot, the script will run automatically as soon as the network is up. By removing the After and Wants lines, you can also make it run without that dependency. You can also manually start and stop the script with
sudo systemctl start autostart
sudo systemctl stop autostart
To check the status of the script and see the associated processes, you can use:
sudo systemctl status autostart
(this last command can also run without sudo, but in that case the logged output of the script
wont be shown).
Read-only system
Stopping a Raspberry Pi (or any other computer!) by simply removing the power is bad practice. On Raspberry Pi, this would typically end up
in the long run with corrupted installations, which in many cases cannot be recovered without a complete reimaging of the SD
card. This happens almost every year, as people tend to disregard this warning. To reduce the risk of corruption, once your installation is
ready you can make it read-only, so that the main filesystem
is never modified; in that case, you can only write temporary files (in a limited amount, as they are stored in RAM). To enable (or disable)
the read-only filesystem, run sudo raspi-config and check the Overlay filesystem option under Performance.
Extension board
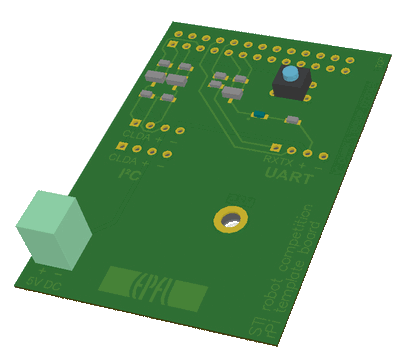 A template (Altium Designer project) for an extension board providing I²C, UART (both 5 V compatible), a 5V power connector, a LED and a pushbutton
can be downloaded here.
A template (Altium Designer project) for an extension board providing I²C, UART (both 5 V compatible), a 5V power connector, a LED and a pushbutton
can be downloaded here.
The board can be plugged directly to the Raspberry Pi 1, and fixed to it using a screw. You can easily modify it to adapt it to Raspberry Pi 2 or 3 or 4. You can either use the adapter board as it is, or modify it according to your needs. Feel free to ask any questions about this design or how to use it.